Tags
affordable, Arts, babies, baby, beginner, birth, cheap, Childbirth, Clothing, Crafts, delivery, DIY, Do it yourself, easy, fabric, girls, hospital, Hospital gown, labor, ladies, Maternity, Motherhood, Needlework, personal, personalized, petty, pink, Pregnancy, ribbon, Sewing, Sewing machine, Shopping, simple, snaps, trimester, unique, women, Women's
Going into my third trimester I really started to think about the inevitable event of labor and delivery. I had come across on my many web shopping escapades super cute hospital gowns for sale. I could not however fork out the amount of cash asking being on a budget and me of course cheap savvy. After mentioning it to my mom she suggested I make my own, how incredible smart my mom is and what a great idea. So of course I google search and come across a pattern over at Lazy Girl Designs! How fantastic! Makes things just that must easier.When I started my last trimester with this pregnancy I decided to make myself a cute hospital gown that maybe I would actually wear during labor and delivery! I ended up making two gowns so with the second I took some pictures to show how I pieced the gown together. I ended up sending one gown to a very close friend of mine who is due less than a week after me! Babies so exciting!
Well let us get started! I found a great free pattern over at Lazy Girl Designs by googling “Hospital Gown”. The ladies there did a fantastic job and the pattern has very easy and simple instructions to follow. You can click the link to get to the pattern here. The pattern gives you a supplies list and some easy instructions on how to sew your very own hospital gown. I have put together a simple step by step process and how I made mine.
First make sure you have everything on the supplies list. I used for my gown
- Two yards of Fabric
- 50″ of 2″ Silk Ribbon
- 50″ of 1″ Silk Ribbon
- 6 snaps
- coordinating string
- Fabric scissors
- Sewing machine
- Lazy Girl Designs Pattern
This pattern is very basic and a beginner skills are only required. Next simply follow the instructions to print of and tape and cut out your own pattern together.
Once that is down its time to cut into your fabric! Make sure you lay your pattern on the fold to cut out the front piece of your gown. For the back you will cut out two separate pieces, so Do Not cut the back pieces on the fold. Do not forget that the pattern gives you sizing options, I am smaller build so my gown is shorter and slimmer. If you are tall I do recommend adding to the bottom otherwise the gown may be above the knee. It is very forgiving so lengthen and shorten to your own body size (or to the person you are making it for) and add about 3″ to that for sewing and hemming.
 Front
Front  Back Right Cut Out
I did not like the deep v-neck on the pattern so I changed that up to make a more curved neck line.
The fun part! Sewing. Sew the gown nice side up.
With a straight stitch sew 1/4″ along the sides of gown with the fancy side up. This will bring the front and two backs together. Start from the bottom to the arm sleeve and stop. Do Not sew past your bottom sleeve. You Want the top completely open so you can add your snaps/ties.
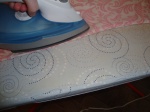
 Press the seam separate and iron both sides
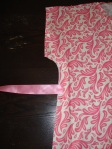
Flip the gown so it is fancy side up and iron out the seams out on both sides of the gown. Also slip the gown on and figure were you would like your back ties or snaps. I used three 6″ pieces of ribbon on both sides. I marked where I wanted the ties ( had some help from the hubby) and pinned them in place in between the seams.
I added ribbon under about 2″ under the arm sleeve. 3 1/2″ – 4″ from that ribbon to the middle of my back and 3 1/2″- 4″ from the back ribbon to my bum.

 Next flip your gown inside out (ugly side facing up) and press the side seams. You then will sew 1/2″ seam to enclose the outside seam.

 Seal your ribbon with a small flame or sew the ends so they do not fray.
unfortunately my computer crashed and I do not have pictures on how I finished the open top of the gown and finishing pictures 😦
All I did with the top was add three snaps on each side. I spaced them about 3″ apart. Once the snaps are in you hospital gown is finished!
Hope you enjoyed my tutorial! Have fun with your own gown!


I am really impressed with your writing skills and also with the layout on your blog.
Is this a paid theme or did you modify it yourself?
Anyway keep up the nice quality writing, it’s rare to see a nice blog like this one these days.
I had a few questions about the sizing. I’m pretty petite as well (5′ tall, 7 months pregnant and only about 36″ at my widest) and I wanted to make this gown. Did you like the fit of only using 2 yards of fabric? Did you alter the width of the pattern by making the two smaller back pieces? I was just curious since the pattern calls for 2.75 yards (which seems like ALOT of fabric). Thanks!
Hi Steph,
2 yards is alot of fabric and I did not use all of it, I would guess maybe a bit over a yard 1/2? I had nearly 4 yards in the fabric that I choose to use so I am not totally sure. I took in between 3″ and 4″ on all three sides of the gown in width and also took it up in length so it was comfortable for my height. I made it to fit me so it was alot of putting it on and pinning it. Hope that helps! Irs very forgiving so if you make it a little to big it can be easily taken in more.